

close
Choose Your Site
Global
Social Media
Views: 0 Author: Site Editor Publish Time: 2026-08-14 Origin: Site


Misaligned drawer fronts, binding glides, and failing soft-close mechanisms compromise the functionality and aesthetic of high-end cabinetry. Determining whether drawer malfunction is caused by installation errors, cabinet racking, out-of-tolerance drawer boxes, or hardware limitations dictates your next steps on the job site. You cannot force a sticking drawer closed and expect the tracks to survive. We provide a technical framework for diagnosing slide issues, utilizing built-in adjustments, and identifying the threshold where troubleshooting fails. You will learn how to evaluate uneven gaps, correct mechanical binding, and execute precision realignments using standard shop tools. Ultimately, we outline when upgrading to modern hardware becomes the most viable solution to permanently eliminate clearance and closing problems.
Diagnosis Before Adjustment: Most binding and sticking issues stem from drawer boxes built outside of the strict 1/16-inch tolerance required by standard undermount slides.
Adjustment Limitations: Basic undermount slides only offer height (1D) adjustments, making it impossible to fix complex skewing or depth issues without reinstalling the hardware.
The Upgrade Path: Upgrading to 3D adjustable undermount drawer slides provides side-to-side, up-and-down, and depth tuning, drastically reducing installation time and ensuring perfectly flush inset drawers.
Replacement Threshold: If slides require constant readjustment, have damaged bearings, or lack multi-directional locking devices, full replacement is more cost-effective than continuous labor.
Visual indicators immediately reveal misaligned drawer fronts. You might notice the left side sitting proud of the cabinet frame while the right side sits flush. Tapered gaps between stacked drawer faces also point to underlying geometry issues. Before adjusting the hardware, you must verify the cabinet carcass itself remains perfectly square. A cabinet that is out of square will twist the metal runners, making it impossible for the drawer to sit flat against the face frame.
Check cabinet squareness using a reliable framing square placed in the interior corners. Push the square tight against the side panel and the back panel. Alternatively, take diagonal measurements from the top-left inside corner to the bottom-right inside corner, and compare it against the top-right to bottom-left measurement. A discrepancy exceeding 1/16 of an inch indicates cabinet racking. Racking twists the slide runners out of parallel alignment, forcing the drawer face to sit askew.
Seasonal wood expansion heavily impacts drawer box width. Solid wood drawer boxes, particularly those made from maple or oak, expand across the grain during high-humidity summer months. This expansion pushes the drawer box sides outward against the metal runners. When the box swells beyond the hardware's engineered clearance, the drawer front shifts, creating uneven exterior reveals and putting immense lateral stress on the tracks. Plywood and MDF boxes resist this expansion, making them a more stable choice for tight-tolerance hardware.
Standard undermount hardware requires exact width and depth tolerances. Typically, the outside width of the drawer box must measure exactly 5/8-inch or 1/2-inch narrower than the interior cabinet opening, depending on the specific slide model and wood thickness. Depth tolerances demand the drawer box match the runner length precisely to engage the rear hooks. If the box is even slightly too long, the front locking clips will not snap into place.
Identify if the drawer box is too wide by feeling the resistance during the final three inches of closure. A wide box pinches the runners outward, causing severe binding. The drawer will feel tight and require excessive force to push shut. Conversely, if the drawer box is too narrow, the front locking devices will repeatedly disengage. You will hear a clicking sound, and the drawer will pull completely off the tracks during normal operation.
Mechanical failure points also cause rough gliding. Inspect the metal tracks for bends, warping, or impact damage. Pull the runners out fully and check for debris accumulation within the ball bearing carriages. Sawdust, drywall dust, finishing overspray, and household dirt frequently pack into the greased bearings, destroying the smooth rolling action. A single piece of grit can cause the entire slide to feel gritty and catch during operation.
Establish proper maintenance protocols before assuming structural failure. Wipe down the extended metal tracks using a clean microfiber cloth and mineral spirits to remove hardened grime. Apply a high-quality, non-stick white lithium grease or dry Teflon lubricant directly to the ball bearings. Cycle the drawer open and closed several times to distribute the lubrication and restore a smooth glide. Never use heavy oils, as they attract more dust and compound the problem.
The soft-close mechanism relies on two primary components: a pneumatic or hydraulic cylinder to dampen the closing speed, and a spring-loaded catch to pull the drawer fully shut. When you push the drawer, a pin on the drawer profile engages the carriage on the cabinet profile, transferring the momentum to the dampener. The fluid inside the cylinder bypasses a small piston, slowing the drawer down before the spring pulls it tight against the cabinet.
Identify a blown pneumatic cylinder by observing the closing action. If the drawer slams shut without any resistance, the cylinder has lost its internal seal and fluid or air has escaped. You might even see an oily residue leaking from the back of the slide. If the drawer stops an inch short of closing and requires a hard push to shut, the catch pin has likely misaligned or jumped the spring carriage.
Establish strict criteria for resetting versus replacing the mechanism. You can reset a tripped spring catch by reaching into the cabinet and manually pulling the plastic carriage forward until it clicks into the loaded position. However, if the plastic carriage is cracked, the spring is snapped, or the cylinder offers zero resistance, the entire slide must be replaced. Soft-close dampeners are sealed units and cannot be repaired on the job site.
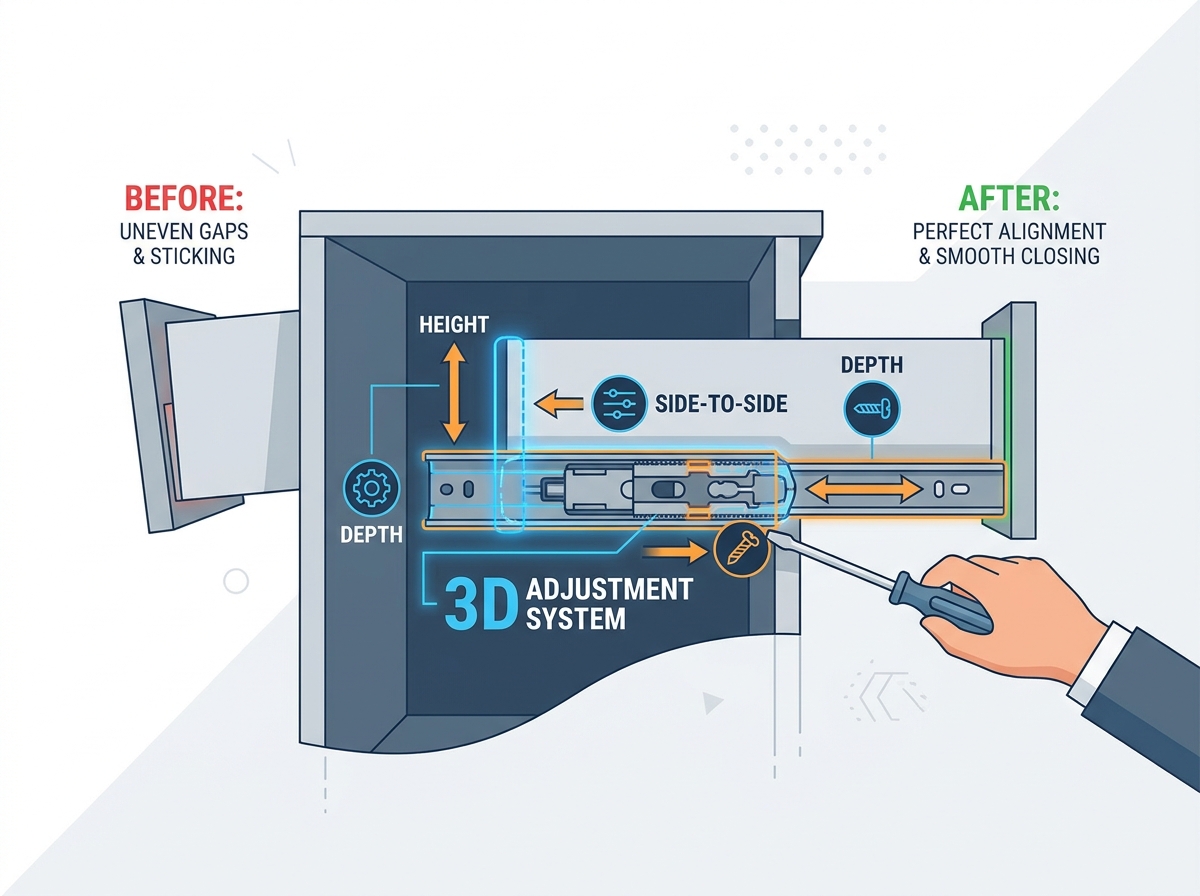
Following a comprehensive undermount slide troubleshooting guide begins with mastering the built-in adjustment features. Locate the adjustment levers on the front locking devices attached to the underside of the drawer box. These plastic clips secure the drawer to the runners and house the primary tuning mechanisms. Depending on the brand, these clips are usually bright orange, green, or grey for easy identification.
Execute the standard height adjustment process to fix sagging drawer fronts. Most locking devices feature a sliding wedge or a rotating dial. Pushing the wedge backward or turning the dial raises the drawer front by up to 1/8-inch. Adjust both sides equally to lift the entire face, or adjust one side to level a tilted drawer. Always check your progress with a small torpedo level placed across the top edge of the drawer front.
Inspect the cabinet profiles for slide-mounted adjustment screws. Certain premium models feature a small cam screw near the rear mounting bracket. Turning this screw allows for minor depth or tilt fine-tuning without removing the drawer. This feature proves invaluable for aligning inset drawer faces flush with the cabinet frame. A quarter-turn of the cam screw can move the drawer face in or out by 1/16-inch.
Note the severe limitations of older or budget-tier slides. Basic models completely lack side-to-side or depth adjustment capabilities. If the horizontal gaps are uneven, or if the drawer face sits too far forward, you cannot fix the issue using the locking clips. You must physically unmount and reposition the metal runners, which consumes significant labor time and weakens the cabinet side panels with extra screw holes.
Introduce a professional, low-impact fix for minor binding. Often, slides bind because the cabinet-side runners are mounted slightly out of parallel. Instead of completely removing the hardware, loosen the cabinet-side mounting screws just a fraction of an inch. Do not remove the screws; simply back them out until the metal runner can wiggle slightly against the cabinet wall.
Cycle the drawer open and closed several times. This action allows the loosened slides to naturally find their parallel center. The physical width of the drawer box forces the metal runners into perfect alignment, eliminating the pinching effect. The slides self-align to the exact tolerances required for frictionless movement. You will feel the binding disappear as the tracks settle into their natural path.
Carefully retighten the screws once the slides settle into their optimal position. Pull the drawer out slowly to avoid shifting the runners. Drive the screws back down firmly using a manual screwdriver. Test the glide again. This simple technique resolves over half of all binding issues caused by hasty initial installations and minor cabinet settling.
Provide a technical fix for a drawer box built too wide. If the box exceeds the maximum width tolerance, no amount of hardware adjustment will stop the binding. Remove the drawer and run the box through a table saw. Shave exactly 1/16-inch off one side of the drawer box. Set the table saw fence carefully, use a sharp crosscut blade to prevent tear-out, and sand the cut edge smooth. This professional woodworking workflow restores the required clearance without having to rebuild the entire box.
Address cabinet openings that are slightly too wide or out of square. If the opening exceeds the drawer box width by more than the specified deduction, the locking clips will fail to engage. Shim the cabinet-side slide members using thin plastic packers or wood veneer. Place the shims behind the mounting brackets to push the runners inward, closing the excess gap. Ensure the shims are placed at both the front and rear mounting points to keep the track perfectly parallel to the cabinet wall.
Drawer Material Thickness | Required Inside Cabinet Width Deduction | Bottom Clearance Required |
|---|---|---|
1/2 inch (13mm) | 5/8 inch (16mm) | 1/2 inch (13mm) |
5/8 inch (16mm) | 3/8 inch (10mm) | 1/2 inch (13mm) |
3/4 inch (19mm) | Not compatible with standard slides | N/A |
When adjustments fail, you must know how to remove and reinstall undermount drawer slides safely. Start by disengaging the front locking clips and pulling the drawer completely out. Use a manual screwdriver to back out the mounting screws from the cabinet profiles. Avoid using an impact driver, as high torque easily strips the shallow screw holes in MDF or particleboard cabinets. If a screw is already stripped, fill the hole with a wooden toothpick and wood glue before attempting to drive a new screw.
Utilize self-centering drill bits (Vix bits) and mounting jigs for the reinstallation process. A dedicated undermount slide jig holds the metal runner perfectly level and square to the cabinet face. The Vix bit, typically a #5 or #7 size, ensures your pilot holes are drilled exactly in the center of the mounting slots. This prevents the screws from pulling the slide off-line as they tighten against the metal bracket.
Always move the mounting screws to fresh pilot holes. Undermount slides feature multiple alternative mounting slots along the metal track. If you reuse the original holes, the screws will naturally wander back into the old, misaligned positions. Drilling fresh holes guarantees the new parallel alignment holds secure under heavy loads. If you must use the same general area, shift the slide forward or backward by 1/8-inch to access clean wood.
Standard hardware restricts your ability to perfect cabinet reveals. True 3D adjustability transforms the installation process by offering independent control over three distinct axes. Upgrading to 3D adjustable undermount drawer slides provides precision tuning directly from the front locking clips, eliminating the need to dismantle the cabinet or shim the tracks.
Height (Up/Down) adjustment aligns horizontal gaps between stacked drawer fronts. Turning the height dial lifts or lowers the drawer box off the metal runner. This axis corrects sagging and ensures uniform horizontal spacing across a bank of drawers. You can easily achieve a perfect 1/8-inch reveal between every drawer face in a stack.
Side-to-Side (Left/Right) adjustment achieves perfect vertical reveals without having to remount the cabinet profiles. A lateral dial on the 3D clip shifts the drawer box horizontally. This compensates for slightly off-center installations and guarantees the vertical gaps between adjacent drawer faces remain perfectly parallel. It eliminates the need to unscrew the tracks just to move the drawer 1/16-inch to the left.
Depth (In/Out) adjustment ensures the drawer face sits perfectly flush with the cabinet frame. This axis is highly critical for inset cabinetry, where the drawer front must align exactly with the surrounding face frame. Depth dials push the drawer box forward or backward, eliminating protruding edges. Without depth adjustment, achieving flush inset doors requires absolute perfection during the initial track installation.
Map the technical feature directly to the outcome. Multi-directional locking devices reduce installation and troubleshooting time by up to 80%. Instead of spending hours shimming runners, redrilling pilot holes, and rebuilding drawer boxes, installers achieve perfect reveals in seconds using only their fingertips. The ability to dial in the fit on the fly keeps projects moving forward.
3D adjustment actively compensates for minor cabinet racking or slightly out-of-square drawer boxes. If a drawer box is built 1/32-inch out of square, a standard slide will bind or sit crooked. A 3D adjustable system absorbs this discrepancy. You simply tweak the left/right and depth dials until the face sits flush, saving the massive cost of remanufacturing the drawer or tearing apart the cabinet carcass.
Compare the dynamic load ratings of standard slides versus heavy-duty 3D adjustable models. Standard builder-grade slides typically support 75 lbs of dynamic load. When loaded with heavy pots, pans, or dishware, these lighter slides flex. The metal carriages warp, causing the drawer to sag and bottom out against the cabinet frame. Over time, the bearings wear down and the soft-close mechanism fails under the strain.
Heavy-duty 3D adjustable models boast dynamic load capacities ranging from 100 to 150 lbs. The thicker steel construction and reinforced ball bearing carriages prevent deflection. Heavier load capacities directly prevent the sagging and bottom-out issues that necessitate frequent readjustment, ensuring the drawer operates smoothly for decades. When building deep pantry pull-outs or heavy file drawers, specifying a 150 lb slide is mandatory for long-term survival.
Evaluate the financial reality of ongoing maintenance. Calculating the cost of continuous adjustments involves tracking labor hours spent diagnosing, shimming, and realigning failing hardware. If you spend two hours attempting to fix a binding drawer, the labor cost quickly exceeds the price of premium replacement hardware. Time spent fighting bad hardware is time stolen from the next phase of the project.
Establish a definitive "replace" verdict. If the existing slide requires physical shimming, redrilling of cabinet holes, or structural drawer box modification, upgrading is the superior choice. Exploring modern undermount slide replacement options resolves the root cause immediately, providing a permanent fix rather than a temporary patch. Swapping out a failing 75 lb slide for a robust 100 lb 3D adjustable model guarantees you will not get called back to fix it again.
Outline the critical specifications required for successful procurement. First, verify drawer box material thickness compatibility. Undermount slides are engineered specifically for 1/2-inch, 5/8-inch, or 3/4-inch side wall thicknesses. Purchasing the wrong specification guarantees the drawer will not fit the opening. Measure the top edge of the drawer box side wall with calipers to be certain.
Measure slide length versus drawer depth. The metal runner must match the exterior depth of the drawer box. Slides are typically available in 3-inch increments, such as 12, 15, 18, and 21 inches. Decide between full extension and over-travel extension types. Full extension brings the back of the drawer flush with the cabinet face, while over-travel pulls it an extra inch forward for maximum access to the back corners.
Highlight the absolute necessity of ensuring the new slides come with compatible 3D locking clips. Do not purchase bare runners. The 3D clips are proprietary to the slide manufacturer and are mandatory for securing the drawer and enabling the multi-directional adjustments discussed earlier. A Blum clip will not work on a Salice slide, and vice versa.
Troubleshooting Symptom | Probable Cause | Recommended Action |
|---|---|---|
Drawer binds in last 3 inches | Drawer box too wide | Shave 1/16" off drawer box side or replace slides |
Drawer falls off tracks | Cabinet opening too wide | Shim cabinet-side runners inward |
Uneven vertical gaps | Cabinet racked or off-center install | Use 3D side-to-side adjustment dials |
Drawer face protrudes | Slide mounted too far forward | Use 3D depth adjustment or remount tracks |
Soft-close slams shut | Blown pneumatic cylinder | Replace entire slide mechanism |
Address the primary risk of retrofitting. Different brands utilize slightly different rear notch and bore hole requirements. The back panel of an undermount drawer box must feature specific cutouts to clear the metal runners, along with a small drilled hole to accept the rear hook pin. If you switch from one brand to another, the existing notches and holes might not align with the new hardware.
Implement strict mitigation strategies before ordering. Measure the existing rear hook hole placement accurately. If the new slides require a different depth or height for the rear pin, you must modify the drawer box back. Use a router or oscillating multi-tool to widen the rear notches. Drill a new 6mm or 7mm hole at the exact height specified by the new slide manufacturer to accommodate the upgraded rear hooks. Take your time on this step, as a sloppy rear hole will cause the drawer to sit loose on the tracks.
Standard undermount slides remain highly sensitive to installation tolerances. While basic troubleshooting fixes minor sagging and sticking, persistent binding or uneven gaps usually indicate a fundamental tolerance issue or a strict hardware limitation. Attempting to force misaligned hardware to function only leads to permanent mechanical failure and damaged cabinetry.
For new builds or full replacements, exclusively specify 3D adjustable undermount drawer slides. The initial hardware investment pays massive dividends by guaranteeing flush alignment, eliminating frustrating binding issues, and minimizing future maintenance calls. You gain complete control over the final reveals without having to rebuild boxes or shim tracks.
Take these actionable next steps to resolve your drawer issues:
Measure your exact drawer box outside width, depth, and side-wall material thickness using digital calipers to determine your baseline tolerances.
Inspect the cabinet interior with a framing square to rule out racking before attempting any hardware adjustments.
Execute the "loosen and self-align" technique on binding runners to quickly correct minor parallel alignment errors.
Order replacement slides bundled with compatible 3D locking devices if your current hardware lacks side-to-side and depth tuning.
Modify the rear notches and bore holes on your existing drawer boxes to match the specifications of your new upgraded slides.
A: Check for physical obstructions behind the drawer box. Ensure the soft-close pin on the drawer profile is properly engaged with the spring catch on the cabinet runner. Verify the drawer box isn't too wide for the opening, which causes the metal tracks to pinch and stop the closing action prematurely.
A: While aftermarket add-on dampeners exist, they are notoriously difficult to align and prone to failure. Replacing the existing hardware with integrated soft-close undermount slides is significantly more reliable, providing a smoother glide and a guaranteed catch mechanism.
A: A tilted drawer usually results from uneven locking clips or unlevel cabinet runners. Locate the height adjustment lever on the locking device of the lower side and push it back to raise that corner. If the lever is maxed out, check the cabinet-side runner with a torpedo level and remount it if necessary.
A: Standard undermount slides require exactly 1/2-inch of bottom clearance between the drawer box and the cabinet floor. Side-to-side clearance depends on material thickness; typically, the drawer box outside width must be exactly 5/8-inch or 1/2-inch narrower than the cabinet opening.
A: No. Locking devices are highly proprietary. A Blum locking clip will not fit a Salice or Hettich slide. You must purchase the exact 3D locking clips engineered for your specific brand and model of undermount slide to ensure proper engagement and adjustability.
A: Drawers fall off tracks when the cabinet opening is too wide or the drawer box is too narrow. This prevents the front locking clips from securely grabbing the metal runners. Shimming the cabinet-side tracks inward restores the proper width tolerance and keeps the clips engaged.


